Note
plgd hub #bundle contains mock OAuth2.0 Server, which simplifies development and conformance testing.
The Open Connectivity Foundation (OCF) is a global, member-driven technical standard development organization. Its 500+ members are working to enable trust, interoperability, and secure communication between IP-connected IoT devices and services. It does this by fostering collaboration between stakeholders across the IoT ecosystem to deliver the freely-available ISO/IEC specifications, including the Secure IP Device Framework, its open-source reference implementation, and an industry-recognized certification program.
The OCF Certification Program includes conformance testing to ensure robust and secure connectivity, and to help manufacturers create products that “just work” with other OCF Certified IoT devices regardless of their form factors, operating systems, service providers or transports.
The plgd hub, reference implementation of OCF Device to Cloud Services and OCF Cloud API for Cloud Services specifications is automatically tested with the OCF Conformance Test Tool (CTT) what guarantees interoperability between OCF Certified IoT devices and Clouds.
If you are user of the plgd hub, interested in the OCF Certification, this tutorial will guide you on how to execute required OCF test cases.
To validate conformance OCF uses a Windows-based application called Conformance Test Tool (CTT). To succeed with the validation you must have a correctly set up environment and configuration file for CTT. The following sections will explain all the necessary steps.
The environment used in this tutorial consists of the following parts:
C:\Program Files (x86)\OCF Conformance Test Tool.C:\Program Files (x86)\OCF Conformance Test Tool\Docs\Users Guide.mhtml. Follow the section named C2C Accessibility.Bridged Adapter value.The services implementing Origin Cloud / Target Cloud API must be available also on the Windows host machine, therefore several environmental variables must be defined.
Run the following commands in your $HOME folder in terminal:
docker run -it --rm \
  -e FQDN=192.168.1.44 \
  --network=host ghcr.io/plgd-dev/hub/bundle:latest
Value for FQDN is machine dependent. If you have followed the previous steps and changed the network settings of the guest machine to Bridged Adapter then you should obtain the address by running ifconfig in terminal and taking the ipv4 address of your active network interface.
After correctly setting up the FQDN variable, the docker command should start up all services in the guest machine. The GUI provided by the plgd hub #bundle should be available at the address set by the FQDN environmental variable, in our example at https://192.168.1.44. Please verify it by opening the address in a browser in your Windows host machine.
The Target Cloud API is implemented by the cloud2cloud-gateway service, which is part of the plgd hub #bundle.
To run CTT test cases, a PICS configuration file is required. Several files should be provided with your CTT installation, among them there should be an example configuration file named PICS_C2C_Target_Cloud_example.json. Take this example file, but some fields must be modified based on your environment. All fields are explained in the CTT User Guide.
{
    ...
    "supportedDeviceTypes": ["oic.d.switch"],
    "authorizationEndpointUrl": "https://{FQDN}/authorize?audience=https://{FQDN}/",
    "tokenEndpointUrl": "https://{FQDN}/oauth/token",
    "c2cApiUrl": "https://{FQDN}/c2c/gw",
    "retrievalScope": "r:* offline_access",
    "updateScope": "r:* w:* offline_access",
    ...
    "cloudServerTrustAnchorCertificate": "...",
    ...
    "validClientId": "testC2C",
    "validClientSecret": "testC2CSecret",
    "supportsResourcesPublishedUnpublishedEvents": true,
    "localEventListenerUri": "https://localhost:55551/events_123",
    "proxyEventListenerUri": "https://4561-95-102-120-86.ngrok.io/events_123"
}
Properties authorizationEndpointUrl, tokenEndpointUrl and c2cApiUrl contain the address of the plgd hub #bundle against which the CTT executes tests. Please update it to match the FQDN value.
plgd hub #bundle contains mock OAuth2.0 Server, which simplifies development and conformance testing.
The values for localEventListenerUri and proxyEventListenerUri are provided by the ngrok application. The guide on how to obtain them is described in the User Guide section Setup for Target Cloud test cases for Events API (CT5.3.X).
The cloudServerTrustAnchorCertificate value should contain a correctly formatted certificate. It should be formatted as a one-liner with Windows line endings, such as:
"cloudServerTrustAnchorCertificate": "-----BEGIN CERTIFICATE-----\r\n ... \r\n-----END CERTIFICATE-----",
The certificate can be retrieved from the plgd hub #bundle by opening https://{FQDN}/.well-known/configuration. Copy the value of the certificateAuthorities property into the cloudServerTrustAnchorCertificate value with proper formatting.
The certificate is regenerated whenever plgd hub #bundle is started. So if you restart your bundle instance, then you must update your PICS configuration as well.
After following all of the previous steps, you should have a running plgd hub #bundle in the Ubuntu machine, a running ngrok application and a prepared PICS configuration file in the Windows machine. You can now start the CTT application. Go to File -> Select IUT, select Target Cloud and click Next. In the next pane IUT Selection click Browse, navigate to your created PICS configuration, select it and click Next twice. The Cloud tests list should now be loaded with 6 CT5.x.x C2C test cases available.
Several of the CTT test cases require 1 or more devices to be running. Moreover, these devices must support several operations including - register, deregister, login, logout and others. Please use cloud_tests device from the Iotivity-lite repository, which is a device created for the purpose of running cloud conformance tests.
The steps needed to compile and run cloud_tests device with plgd hub #bundle’s mock OAuth2.0 server follow:
Checkout IoTivity-Lite:
git clone https://github.com/iotivity/iotivity-lite.git --recursive
cd iotivity-lite
Build cloud_tests in the port/linux folder:
cd port/linux
make CLOUD=1 SECURE=0 OSCORE=0 cloud_tests
Run cloud_tests in the port/linux folder:
The cloud_tests binary has 6 optional positional arguments:
1: device name
2: authorization code
3: cis
4: sid
5: apn
6: device ID
Choose whatever device name you want. The authorization code is not verified by the mock OAuth2.0 server, but it must be non-empty. For a device to work with the plgd hub #bundle, the cis, sid and apn arguments must have specific values.
./cloud_tests "ctt-1" "test" "coap+tcp://127.0.0.1:5683" "00000000-0000-0000-0000-000000000001" "plgd"
If everything is in order, then the cloud_tests binary should print output similar to the following:
device_name: ctt-1
auth_code: test
cis : coap+tcp://127.0.0.1:5683
sid: 00000000-0000-0000-0000-000000000001
apn: plgd


################################################
OCF Cloud-connected Device Certification Test Tool
################################################
[0] Display this menu
-----------------------------------------------
[1] Cloud Register
[2] Cloud Login
[3] Cloud Logout
[4] Cloud DeRegister
[5] Cloud Refresh Token
[6] Publish Resources
[7] Send Ping
[8] Unpublish switch resource
[9] Publish switch resource
-----------------------------------------------
-----------------------------------------------
[10] Exit
################################################

Select option:
Input the option number to issue the selected command to the binary.
The Origin Cloud API is implemented by the cloud2cloud-connector service, which is part of the plgd hub #bundle. The public API can be examined at https://github.com/plgd-dev/hub/blob/main/cloud2cloud-connector/swagger.yaml.
Support of the API in the plgd hub #bundle GUI is planned, but not yet implemented. So for now you need an application or a utility that allows you to send HTTP requests with custom headers. In this guide I will use the Postman application.
Additionally, several of the Origin Cloud test cases require different setup of the cloud2cloud-connector and also different values in the PICS configuration. Only with the correct configuration of each, the test cases will succeed.
When running with the ngrok application do not forget to apply the manual changes to the underlying Python code described in the User Guide section Setup for all Origin Cloud test cases.
After starting the bundle as described in Run plgd hub #bundle in Ubuntu machine the cloud2cloud-connector service is available at the address https://{FQDN}/c2c/connector.
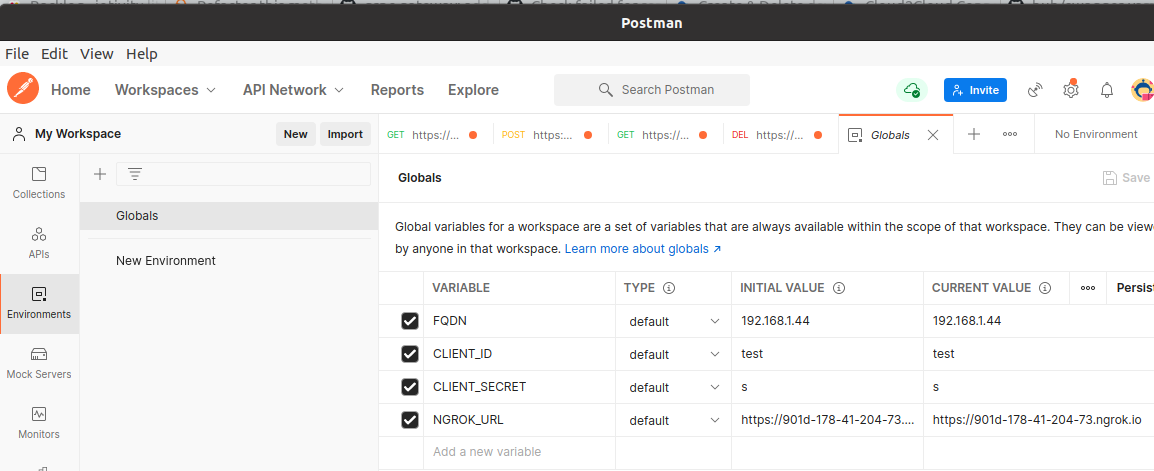
In the sidebar select Environment, open the Globals pane and setup several variables there:
| Variable | Value |
|---|---|
| FQDN | {FQDN} |
| CLIENT_ID | test |
| CLIENT_SECRET | s |
| NGROK_URL | https://4561-95-102-120-86.ngrok.io |
For FQDN use the value obtained in Run plgd hub #bundle in Ubuntu machine. CLIENT_SECRET can be any non-empty value. NGROK_URL value is provided by the ngrok application as described in the User Guide section Setup for all Origin Cloud test cases.
Each command to cloud2cloud connector (Origin Cloud) requires an authorization header with a valid JWT token, otherwise it will fail. We can use Postman to request and store a JWT token, which we can then append to various commands. To request a token create a new HTTP Request (CTRL+N and then select HTTP Request). In the horizontal menu of the new request select the Authorization pane. Set the type of the token to OAuth 2.0 and for the new token configure the following options:
| Option | Value |
|---|---|
| Token Name | ctt |
| Grant Type | Authorization Code |
| Callback URL | https://{{FQDN}}/ |
| Auth URL | https://{{FQDN}}/authorize |
| Access Token URL | https://{{FQDN}}/oauth/token |
| Client ID | {{CLIENT_ID}} |
| Client Secret | {{CLIENT_SECRET}} |
Keep default values in the remaining fields.
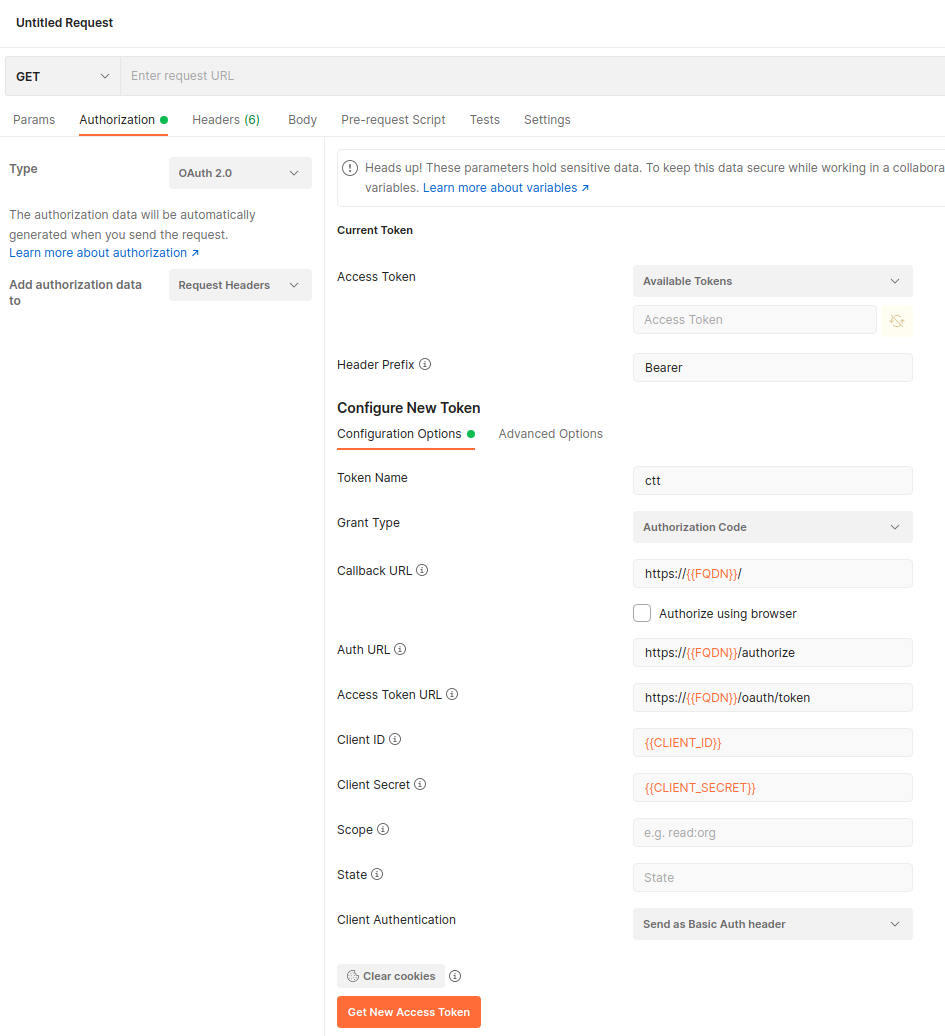
Click on the Get New Access Token button and you should obtain a new valid JWT token. Postman will store the token and it will be available under the selected Token Name. This token can be used to validate all Origin Cloud API commands.
The token was obtained from the mock OAuth2.0 Server contained in the plgd hub #bundle. If you restart the bundle you must obtain a new token, because the old one will no longer be valid.
To create a linked cloud send a POST request to https://{{FQDN}}/c2c/connector/api/v1/clouds with a valid JWT token and a request body containing the following JSON:
{
  "name": "CTT",
  "oauth": {
    "clientId": "client123",
    "clientSecret": "1234567890ABCDEF",
    "scopes": [
      "r:*"
    ],
    "authUrl": "{{NGROK_URL}}/authorize",
    "tokenUrl": "{{NGROK_URL}}/token",
    "redirectUrl": "https://{{FQDN}}/c2c/connector/api/v1/oauthCallback"
  },
  "supportedSubscriptionEvents": {
    "devices": [
      "devices_online",
      "devices_offline",
      "devices_registered",
      "devices_unregistered"
    ],
    "device": ["resources_published", "resources_unpublished"],
    "resource": ["resource_contentchanged"],
    "staticDeviceEvents": false
  },
  "endpoint": {
    "url": "{{NGROK_URL}}/api/v1",
    "insecureSkipVerify": true
  }
}
The values of oauth.* and supportedSubscriptionEvents fields vary between the Origin Cloud test cases. So to pass a test case you will usually need to create a new linked cloud with a given set of parameters.
On success, the server sends a response with HTTP code 200 and a body containing the data of the newly created linked cloud in JSON format. The data should copy the request values, but it should contain at least one additional value — id of the new cloud.
{
    ...
    "id": "73dcb3a2-a59a-48d3-bede-4acb66eb2f75",
    ...
}
To create a linked account you must have both plgd hub #bundle (Origin Cloud) and CTT (Target Cloud) up and running. CTT starts a Target Cloud simulator only if you have started some 6.x.x test case. At the beginning of the test, CTT will prompt you to execute the Account Linking process. This prompt will contain data needed to create an Origin Cloud that CTT expects.
| Prompt value | Create Linked Cloud JSON field |
|---|---|
| Authorization Endpoint | oauth.authUrl |
| Token Endpoint | oauth.tokenUrl |
| client_id | oauth.clientId |
| client_secret | oauth.clientSecret |
| redirect_uri | oauth.redirectUrl |
| scope | oauth.scopes |
For oauth.authUrl and oauth.tokenUrl values, CTT will provide addresses with the form https://127.0.0.1:55551/{endpoint}. You must use the tunnel started by ngrok and translate the address before sending the create linked cloud request.
For example, if your NGROK_URL is https://4561-95-102-120-86.ngrok.io then this is the translation you need to do:
| Original address | Translated address |
|---|---|
https://127.0.0.1:55551/authorize | https://4561-95-102-120-86.ngrok.io/authorize |
https://127.0.0.1:55551/token | https://4561-95-102-120-86.ngrok.io/token |
After the origin cloud is successfully created, send a GET request with a valid JWT token and an empty body to https://{{FQDN}}/c2c/connector/api/v1/clouds/{CLOUD_ID}/accounts to start the linking process. Both Origin Cloud and Target Cloud use tokens to authenticate their operations. Origin Cloud will take the access token from the request header, Target Cloud (CTT) will do its own authentication to get a token from its authorization service. CTT uses a login screen for authentication and provides a prompt with credentials when it detects a redirect to the login screen. If you have everything setup correctly then the original GET request that started the linking process will result in a series of redirects that end in the login screen. Upon entering the credentials you will be redirected to a consent screen where you can grant or deny the application the requested scope. If you grant the request then the linking process is done and the Linked Account should be created.
The Postman application allows you to preview the login screen, but it does not allow you to enter and submit the credentials. You must use a browser for that. You cannot send the original GET request from the browser, because you need the Origin Cloud JWT token to be sent with the request. However, only URIs handled by the Origin Cloud require the token. After several redirects the request reaches a URI handled by CTT and the original request token is no longer necessary.
Use the Postman console to examine the redirect chain that gets generated after sending the GET request. You should see something like the following:
| HTTP Method | Address | HTTP Status |
|---|---|---|
| GET | https://192.168.1.44/c2c/connector/api/v1/clouds/6e3c2718-92a0-4edf-8ea0-702f975cd303/accounts | 307 |
| GET | https://192.168.1.44/authorize?access_type=offline&audience=test&... | 302 |
| GET | https://192.168.1.44/c2c/connector/api/v1/oauthCallback?code=... | 307 |
| GET | https://795c-178-41-204-73.ngrok.io/authorize?client_id=client123&redirect_uri=... | 302 |
| GET | https://795c-178-41-204-73.ngrok.io/login_screen?id=CNZX2QIAC0 |

In the redirect chain there are two groups of requests – those addressed to {FQDN} URIs and those addressed to {NGROK_URL} URIs. The Origin Cloud handles the first group of requests and they need a valid JWT token in headers. CTT handles the second group of requests, and these requests do not require the original JWT token in headers. So to make this work, simply take the first address prefixed by {NGROK_URL} and copy it to your browser. It will redirect you to the login screen and allow you to enter the credentials and then grant the requested scope in the consent screen.
There are third-party plugins that allow you to modify the headers the browser sends. When you add an authorization header with a valid JWT token then sending the original GET request from browser should work.)
To get stored data, send a GET request to https://{{FQDN}}/c2c/connector/api/v1/clouds and it will return JSON with cloud and account data.
Example output:
{
    "6e3c2718-92a0-4edf-8ea0-702f975cd303": {
        "accounts": {
            "91e833ed-328a-4028-ac82-9e2746aa29a2": {
                "account": {
                    "Data": {
                        "OriginCloud": {
                            "AccessToken": "...",
                            "Expiry": null,
                            "RefreshToken": "..."
                        },
                        "State": 3,
                        "TargetCloud": {
                            "AccessToken": "...",
                            "Expiry": "2022-01-20T13:20:47.301016131Z",
                            "RefreshToken": "..."
                        }
                    },
                    "ID": "91e833ed-328a-4028-ac82-9e2746aa29a2",
                    "LinkedCloudID": "6e3c2718-92a0-4edf-8ea0-702f975cd303",
                    "UserID": "1"
                },
                "subscription": {
                    "CorrelationID": "8804e90c-53f7-45b8-a9af-128b6bc8cd10",
                    "DeviceID": "",
                    "Href": "",
                    "ID": "7f5af6d4-64b9-4ce4-8f34-371ddb490272",
                    "LinkedAccountID": "91e833ed-328a-4028-ac82-9e2746aa29a2",
                    "LinkedCloudID": "6e3c2718-92a0-4edf-8ea0-702f975cd303",
                    "SigningSecret": "y7rZ6g404aUuMYFBps553ig2Jo8DQZy9RNlNvWeU1EI=",
                    "Type": "devices"
                }
            }
        },
        "cloud": {
            "endpoint": {
                "insecureSkipVerify": true,
                "rootCas": null,
                "url": "https://795c-178-41-204-73.ngrok.io/api/v1",
                "useSystemCas": false
            },
            "id": "6e3c2718-92a0-4edf-8ea0-702f975cd303",
            "name": "CTT",
            "oauth": {
                "accessType": "",
                "audience": "",
                "authStyle": "",
                "authUrl": "https://795c-178-41-204-73.ngrok.io/authorize",
                "clientId": "client123",
                "clientSecret": "1234567890ABCDEF",
                "clientSecretFile": "",
                "redirectUrl": "https://192.168.1.44/c2c/connector/api/v1/oauthCallback",
                "responseMode": "",
                "responseType": "",
                "scopes": [
                    "r:*"
                ],
                "tokenUrl": "https://795c-178-41-204-73.ngrok.io/token"
            },
            "supportedSubscriptionEvents": {
                "device": [
                    "resources_published",
                    "resources_unpublished"
                ],
                "devices": [
                    "devices_online",
                    "devices_offline",
                    "devices_registered",
                    "devices_unregistered"
                ],
                "resource": [
                    "resource_contentchanged"
                ],
                "staticDeviceEvents": false
            }
        }
    }
}
To delete a linked cloud with the given {CLOUD_ID}, send a DELETE request with a valid JWT token and an empty body to https://{{FQDN}}/c2c/connector/api/v1/clouds/{CLOUD_ID}. CLOUD_ID is the unique identifier of the cloud, which is received in the response when creating an Origin Cloud or in the list command.
On success, the server sends an empty response with HTTP code 200.
To delete linked account with the given {ACCOUNT_ID}, from the cloud with {CLOUD_ID}, send a DELETE request with a valid JWT token and an empty body to https://{{FQDN}}/c2c/connector/api/v1/clouds/{CLOUD_ID}/accounts/{ACCOUNT_ID}. To get the ACCOUNT_ID value use the list command. In the output identify the account you want to delete and copy the ID value contained within the account JSON object.
Start the plgd hub #bundle with default configuration. Modify the PICS configuration file to contain the following:
"redirectUri": "https://{FQDN}/c2c/connector/api/v1/oauthCallback",
Start up CT6.1.1 test case and proceed until the prompt with the data for Origin Cloud appears. To link Origin Cloud with Target Cloud perform the steps described in Section Create Linked Account. For the fields of the Origin Cloud configuration not defined in the CTT prompt use the following:
{
  "name": "CTT-6.1.1",
  "oauth": {
    Use values provided by CTT
  },
  "endpoint": {
    "url": "{{NGROK_URL}}/api/v1",
    "insecureSkipVerify": true
  }
}
To unlink Origin and Target Clouds find the correct CLOUD_ID and ACCOUNT_ID values using the list command, and delete the account or the cloud.
Before starting the plgd hub #bundle you must modify the Cloud2Cloud Connector Configuration:
apis.http.pullDevices.disabled: false
taskProcessor.delay: "20s"
Use the same PICS configuration file as previously. For the fields of the Origin Cloud configuration not defined in the CTT prompt use the following:
{
  "name": "CTT-6.2.1",
  "oauth": {
    Use values provided by CTT
  },
  "supportedSubscriptionEvents": {
    "devices": ["devices_online"],
    "device": ["resources_published"],
    "resource": ["resource_contentchanged"],
    "staticDeviceEvents": true
  },
  "endpoint": {
    "url": "{{NGROK_URL}}/api/v1",
    "insecureSkipVerify": true
  }
}
Use plgd hub #bundle with the same Cloud2Cloud Connector Configuration as in the previous case.
Next, modify the PICS configuration file to contain the following:
"redirectUri": "https://{FQDN}/c2c/connector/api/v1/oauthCallback",
"asynchronousOperation": true,
For the fields of the Origin Cloud configuration not defined in the CTT prompt use the following:
{
  "name": "CTT-6.2.2",
  "oauth": {
    Use values provided by CTT
  },
  "supportedSubscriptionEvents": {
    "devices": ["devices_online"],
    "device": ["resources_published"],
  },
  "endpoint": {
    "url": "{{NGROK_URL}}/api/v1",
    "insecureSkipVerify": true
  }
}
To modify the proxied resources from the Target Cloud use the plgd hub #bundle GUI available at the address https://{FQDN}.
Start the plgd hub #bundle with default configuration. Modify the PICS configuration file to contain the following:
"redirectUri": "https://{FQDN}/c2c/connector/api/v1/oauthCallback",
"bulkSubscribe": true,
"asynchronousOperation": false,
"cloudClientTrustAnchorCertificate: "...",
For the cloudClientTrustAnchorCertificate use the root certificate authority certificate of the plgd hub #bundle. You can obtain the certificate by sending a GET request to https://{FQDN}/.well-known/configuration. Use the certificateAuthorities contained in the JSON response.
The root certificate authority can also be obtained by accessing the data folder of the running bundle. The certificate is stored in the data/certs/root_ca.crt file.
The certificates are regenerated whenever the bundle is restarted and previous certificates are no longer valid.
Older versions of the CTT ignore the cloudClientTrustAnchorCertificate value from the PICS file. As a workaround you can import the certificate as a trusted certificate system wide in Windows.
For the fields of the Origin Cloud configuration not defined in the CTT prompt use the following:
{
  "name": "CTT-6.3.1",
  "oauth": {
    Use values provided by CTT
  },
  "supportedSubscriptionEvents": {
      "devices": ["devices_online", "devices_offline", "devices_registered", "devices_unregistered"]
  },
  "endpoint": {
    "url": "{{NGROK_URL}}/api/v1",
    "insecureSkipVerify": true
  }
}
To unsubscribe from “Devices-level” events delete the linked account. The deletion of the linked account cancels the subscriptions of all events.
Before starting the plgd hub #bundle you must modify the Cloud2Cloud Connector Configuration:
apis.http.pullDevices.disabled: false
Use the PICS configuration file as in the previous case. For the fields of the Origin Cloud configuration not defined in the CTT prompt use the following:
{
  "name": "CTT-6.3.2",
  "oauth": {
    Use values provided by CTT
  },
  "supportedSubscriptionEvents": {
      "device": ["resources_published", "resources_unpublished"]
  },
  "endpoint": {
    "url": "{{NGROK_URL}}/api/v1",
    "insecureSkipVerify": true
  }
}
To unsubscribe from “Device-level” events delete the linked account. The deletion of the linked account cancels the subscriptions of all events.
Use plgd hub #bundle with the same Cloud2Cloud Connector Configuration and the same PICS configuration as in the previous case.
For the fields of the Origin Cloud configuration not defined in the CTT prompt use the following:
{
  "name": "CTT-6.3.3",
  "oauth": {
    Use values provided by CTT
  },
  "supportedSubscriptionEvents": {
      "resource": ["resource_contentchanged"]
  },
  "endpoint": {
    "url": "{{NGROK_URL}}/api/v1",
    "insecureSkipVerify": true
  }
}
To unsubscribe from “resource_contentchanged” event delete the linked account. The deletion of the linked account cancels the subscriptions of all events.
Before starting the plgd hub #bundle you must modify the Cloud2Cloud Connector Configuration:
taskProcessor.delay: "20s"
Next, modify the PICS configuration file to contain the following:
"redirectUri": "https://{FQDN}/c2c/connector/api/v1/oauthCallback",
"bulkSubscribe": true,
"asynchronousOperation": true,
"cloudClientTrustAnchorCertificate: "...",
For the cloudClientTrustAnchorCertificate use the root certificate authority certificate of the plgd hub #bundle. You can obtain the certificate by sending a GET request to https://{FQDN}/.well-known/configuration. Use the certificateAuthorities contained in the JSON response.
If you’re using an older versions of the CTT see the note in Section CT6.3.1
For the fields of the Origin Cloud configuration not defined in the CTT prompt use the following:
{
  "name": "CTT-6.3.4",
  "oauth": {
    Use values provided by CTT
  },
  "supportedSubscriptionEvents": {
      "devices": ["devices_online", "devices_offline", "devices_registered", "devices_unregistered"],
      "device": ["resources_published", "resources_unpublished"],
      "resource": ["resource_contentchanged"],
  }
  "endpoint": {
    "url": "{{NGROK_URL}}/api/v1",
    "insecureSkipVerify": true
  }
}
To unsubscribe from all events delete the linked account.
plgd makes it simpler to build a successful IoT initiative – to create a proof of concept, evaluate, optimize, and scale.

